Preparing Usb That Auto Installs Debian 11
I have been setting up my home lab, which consists of 5 servers and instead of spending 30-40 minutes installing Debian interactively I decided to spend 4-5 hours automating the process, so all you would have to do is choose the boot option as USB for the OS to be installed. After trial and error of multiple re-installs, here are the steps I took to succeed:
- Create bootable USB flash drive
- Create preseed file
- Update grub.cfg, isolinux.cfg and txt.cfg
Creating bootable USB flash drive
I am not going to go into detail how to do this, as this is a pretty straight-forward process and there are different ways to achieve it. I used amd64 image which can be downloaded from Debian page. And then used Rufus to create a bootable USB from that image.
Creating preseed file
Once your bootable USB flash drive is prepared, you will need to create a preseed file. This file is used during the installation to automatically provide the values to the questions that you are asked normally during interactive installation. There are many options which can be found on Debian Appendix B, but my goal was to set up a basic server with SSH installed, as I later use Ansible to finish configuring the server as desired, thus your preseed file might differ based on your requirements. Empty lines or lines starting with # are ignored during installation.
preseed.cfg
# Set language, country, locale, keyboard
d-i debian-installer/language string en
d-i debian-installer/country string US
d-i debian-installer/locale string en_US.UTF-8
d-i keyboard-configuration/xkb-keymap select us

# If possible, automatically selects a network interface that has a link
d-i netcfg/choose_interface select auto
# Sets hostname and domain
d-i netcfg/get_hostname string hostname
d-i netcfg/get_domain string domain.com
# Disables WEP key dialog
d-i netcfg/wireless_wep string

# Set up mirror settings that may be used to download additional components for the installed and to setup sources.list
d-i mirror/country string manual
d-i mirror/http/hostname string http.us.debian.org
d-i mirror/http/directory string /debian
d-i mirror/suite string testing
d-i mirror/http/proxy string

# Specifies a disk to partition. If there is only one disk, installer automatically defaults to it
d-i partman-auto/disk string /dev/sda
# Specifies partition method to be LVM
d-i partman-auto/method string lvm
# Specifies to use all available space for LVM partition
d-i partman-auto-lvm/guided_size string max
# Skip the warning if there is an old LVM configuration
d-i partman-lvm/device_remove_lvm boolean true
# Skip the warning if there is an old RAID array
d-i partman-md/device_remove_md boolean true
# Skip the confirmation to write the LVM partition
d-i partman-lvm/confirm boolean true
d-i partman-lvm/confirm_nooverwrite boolean true
# Specifies to put all files in one partition
d-i partman-auto/choose_recipe select atomic
# Makes partman automatically partition without confirmation
d-i partman-partitioning/confirm_write_new_label boolean true
d-i partman/choose_partition select finish
d-i partman/confirm boolean true
d-i partman/confirm_nooverwrite boolean true

# Installs grub automatically to MBR if not other OS is detected on the machine
d-i grub-installer/only_debian boolean true
# Specifies a disk to which to install grub
# Required as installer might fail to properly identify between USB and the CD and without this option might still ask you to choose
d-i grub-installer/bootdev  string /dev/sda

# Set root password (might want to change this part if your USB will be shared)
passwd passwd/root-password password somepassword
passwd passwd/root-password-again password somepassword
# Skip creating additional users
passwd passwd/make-user boolean false

# Installs standard tools and SSH server
tasksel tasksel/first multiselect standard, ssh-server
# Accept to report back on what software is installed and what software is used
d-i popularity-contest/participate boolean true
# Skip the last message that installation is complete
d-i finish-install/reboot_in_progress note
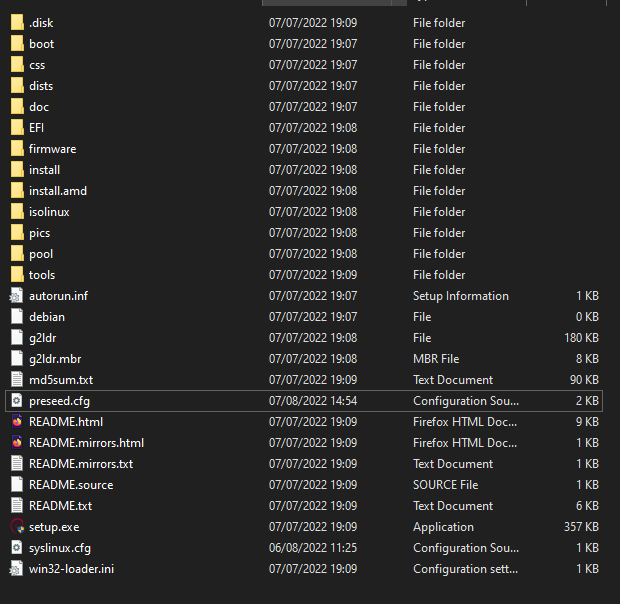
Put this file in the root directory of USB, it should look like:
Updating grub.cfg, isolinux.cfg and txt.cfg
With the preseed.cfg file in place, you need to tell the installer to use it. For that, you have to update 2 files - grub.cfg and txt.cfg.
grub.cfg
Using above image as root directory, you will find grub.cfg in boot/grub directory - boot/grub/grub.cfg, open the file and find the following lines:
menuentry --hotkey=i 'Install' {
    set background_color=black
    linux    /install.amd/vmlinuz vga=788 --- quiet
    initrd   /install.amd/initrd.gz
}
Update the linux line, so it would be:
menuentry --hotkey=i 'Install' {
    set background_color=black
    linux    /install.amd/vmlinuz preseed/file=/cdrom/preseed.cfg auto-install/enable=true vga=788 --- quiet
    initrd   /install.amd/initrd.gz
}
preseed/file=/cdrom/preseed.cfg specifies the preseed file to use.
auto-install/enable=true delays the asking of localization questions, without this line you wouldn’t be able to preseed them in preseed.cfg
txt.cfg
txt.cfg file can be found by navigating from the root directory to isolinux - isolinux/txt.cfg, open the file and edit the append line from:
label install
	menu label ^Install
	kernel /install.amd/vmlinuz
	append vga=788 initrd=/install.amd/initrd.gz --- quiet
To:
label install
	menu label ^Install
	kernel /install.amd/vmlinuz
        append preseed/file=/cdrom/preseed.cfg auto-install/enable=true vga=788 initrd=/install.amd/initrd.gz --- quiet
isolinux.cfg
Finally, we want to update isolinux.cfg file, which can be found in the same directory as txt.cfg - isolinux/isolinux.cfg. We need to change default line from vesamenu.c32:
# D-I config version 2.0
# search path for the c32 support libraries (libcom32, libutil etc.)
path
include menu.cfg
default vesamenu.c32
prompt 0
timeout 0
To install:
# D-I config version 2.0
# search path for the c32 support libraries (libcom32, libutil etc.)
path
include menu.cfg
default install
prompt 0
timeout 0
This allows us to skip the menu which asks you what type of installation you want and directly goes to install option.
That is all
Now you are ready - plug the USB into the device you want to install Debian to, select that USB as a boot option and watch how the installation goes through without any input required from you.