How We Chose Our Goteleport Setup
Recently, I had the pleasure of setting up GoTeleport in highly available fashion. As described in their GoTeleport docs:
Teleport is a certificate authority and access plane for your infrastructure. With Teleport you can:
- Use a single solution to access your SSH servers, Kubernetes clusters, databases, desktops, and web applications.
- Define sophisticated access policies for every component of your infrastructure, with fine-grained audit logs and session recordings.
- Automatically on– and off-board users via integrations with single sign-on providers like GitHub, Okta, and Google Workspace.
We required high availability as our infrastructure would be reachable only via Teleport, so downtime meant users wouldn’t be able to reach required servers, thus we wanted no downtime or at most few minutes of it if one of Teleport components would fail.
Initial setup
Teleport has the following data types:
- Core cluster state - cluster configuration and identity
- Audit events - events from the audit log
- Session recordings - raw terminal recordings of interactive sessions
- Teleport instance state - ID and credentials of a non-auth teleport instances
Each of the data type has its own supported storage backends - default is a local directory, but GCP/AWS are also supported (teleport instance state data type supports only local directory). Core cluster state can also be stored in etcd, which is great as GCP/AWS were not an option for us.
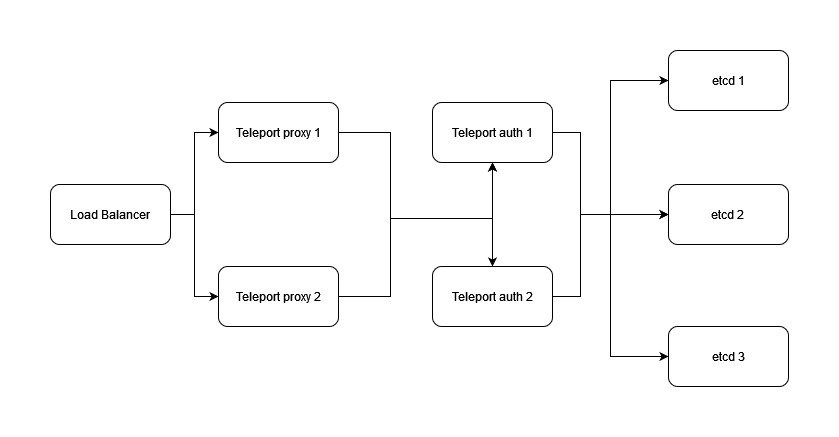
Our initial setup was 1 Load Balancer, 2 Teleport proxy servers, 2 Teleport auth servers and 3 etcd servers:
This setup had the following benefits:
- Different Teleport components were in different data centers
- Easy to scale
Different data centers
Different components were in different data centers, meaning if Teleport Proxy 1 datacenter would experience issues, Teleport Proxy 2 would still be up (same for Teleport Auth and etcd servers). This means that some serious problems would need to occur for Teleport to be completely down.
Scaling
This setup also made it effortless to scale the Teleport cluster, as you could just add required components.
However, this setup has few drawbacks.
- Audit events and session recordings are on separate Teleport auth servers
- Price
- Speed
Audit events and session recordings
If you were to try to inspect logs/recordings, you wouldn’t see the whole picture. This wasn’t a dealbreaker as audit events could be aggregated easily as they are in JSON format. Each session recording is in a separate file, so gathering them in one place wouldn’t be an issue. This would be a bigger problem if one would only rely on Teleport Web UI to view this information.
Price
More servers you have, more money you pay. Though the costs weren’t concerning, it still felt a little of an overkill as our infrastructure doesn’t consist of many servers or users.
Speed
This was the part which caused us to reconsider our setup. Connection time increased by 3-4 seconds, and it was even worse via VPN. This doesn’t sound too bad, but it felt too much for our infrastructure.
Current setup
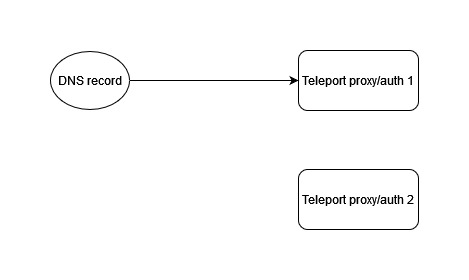
After some discussion, we decide to go with much simpler option - Active/Passive setup with 2 servers each of them has both Teleport Proxy and Teleport Auth and stores all data types locally:
Compared to original setup, we observed following advantages:
- Speed increase
- Cost reduction
- Fewer things to maintain
- Audit events and session recordings in one place
Speed increase
With this setup, connection time increase is up to 2 seconds via VPN, and it is barely noticeable without VPN.
Cost reduction
From 8 servers, it went down to 2, which naturally reflects in costs.
Fewer things to maintain
Apart from cost reduction, you also have fewer things to maintain, it is a lot easier to secure and keep software up to date of 2 servers than 8.
Audit events and session recordings
Now as you have only 1 active Teleport Auth server at a time all session recordings and audit event logs will be in one place, so aggregating is no longer necessary and Teleport Web UI become reliable for inspecting them.
Sadly, everything has its disadvantages:
- Core cluster state backups are a must
- Harder to scale
- Downtime
Backups
In the original setup, core cluster state was stored in etcd cluster, meaning if one of the Teleport Auth servers would go down, the second server would be fine. Now, if an active Teleport Auth server goes down, and you don’t have a backup of a core cluster state, you will lose all user data. Luckily, it is an SQLite file, so backing it up is a minor inconvenience.
Scaling
Since Teleport Proxy and Auth are on the same server, it became a lot harder to scale. Scaling Teleport Auth in this setup is impossible and to scale Teleport Proxy you would need to separate components.
Downtime
If an active Teleport server goes under, you would instantly have downtime, which would last until you switch DNS records to point to the passive server. Furthermore, if backed up core cluster state is not present on a passive server, there would be additional downtime until it would be moved there. As our cluster state is backed up few times a day, and it is always present on a passive server, downtime wouldn’t last longer than few minutes, which was fine with us.
Possible user data inconsistency is another minor problem that rises due to this setup. If the active Teleport server goes down some hours after the latest backup, a passive server might not have the newest information. One of the scenarios where user could feel it would be password change, if a user changes the password and the backup didn’t go through yet, after the switch to passive server user’s password would be the old one. Luckily, it is something that we are alright with.
Wrapping up
As discussed, each setup has its advantages and disadvantages, so in the end we had to make a choice and sacrifice some advantages of one setup to get the benefits of another. Fortunately, our requirements allowed us some downtime, which in turn led to faster connection times, reduced maintenance work and costs.